General Lothaire the Eagle-Bearer
- Location
- The Battlefield, Valley of Ashes
- Catalyst drop on the wiki
- 10000
- Note
- Not optional. Quests Revival and Regroup.
Named fights
Three bosses sit on one table: Lothaire, Aurelius, and the Sphinx.
Open Lothaire first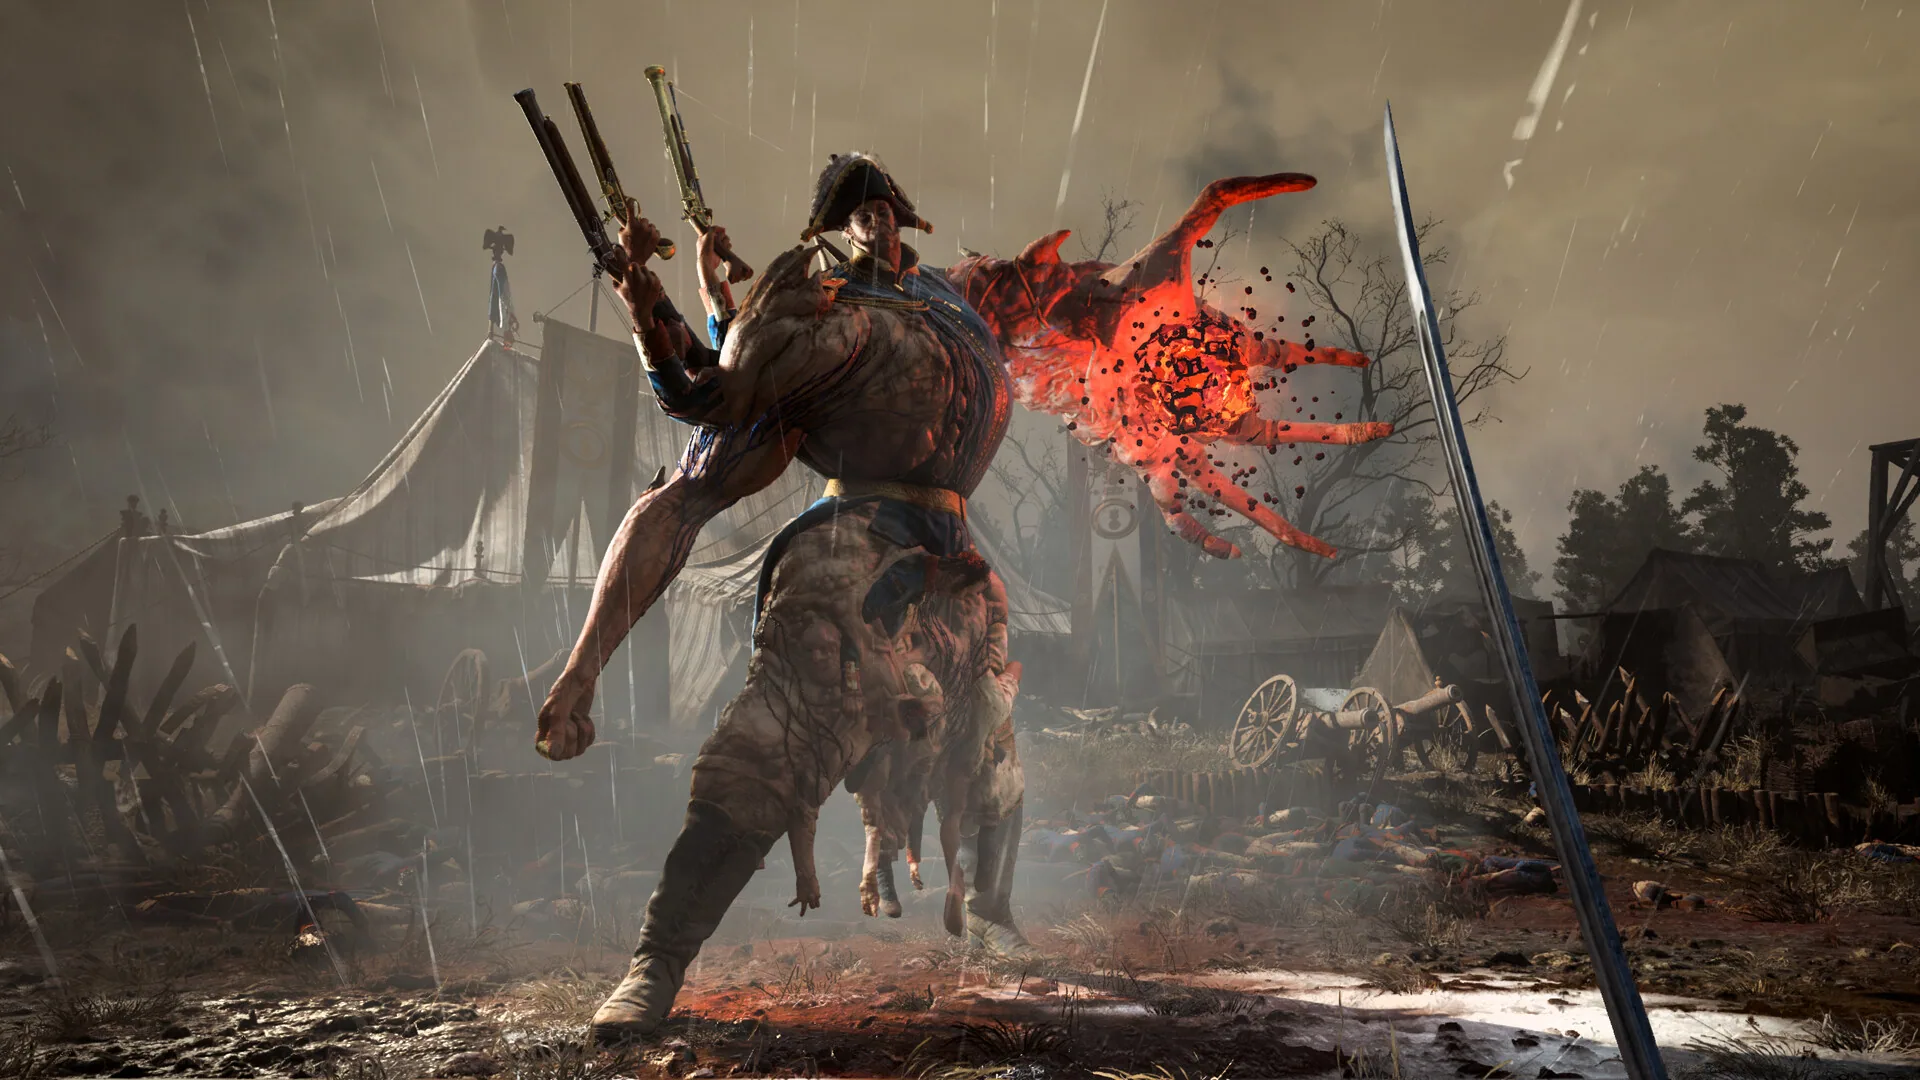
Three named fights on one table. Catalyst drops are 10000, 15000, and 20000.
| Boss | Location | Catalyst drop on the wiki | Note |
|---|---|---|---|
| General Lothaire the Eagle-Bearer | The Battlefield, Valley of Ashes | 10000 | Not optional. Quests Revival and Regroup. |
| High Justiciar Aurelius, Last of the Faithful | Village | 15000 | Chapter 7, Witch Hunt, toward the lighthouse. |
| Sphinx, Devourer of the Unworthy | Caverns | 20000 | Chapter 4, after the cart through the Salt Mines. |
He is the Battlefield commander. The fight is not optional, and he drops 10000 Catalysts.
General Lothaire the Eagle-Bearer is fought on the Battlefield and again in the Valley of Ashes. The main quests are Revival and Regroup. That is the early route, close to William's grave.
He drops 10000 Catalysts. The fight is not optional. Do not hunt a side path around the banner.
He is a massive mutated soldier: three extra shoulder arms that fire pistols, a longsword, and a flagpole. He is a commander with the empire's banner in an enlarged arm, and a mass of soldier heads in one body. That is the look of the model. The tells are below.
Three weak points are called out: glowing orange on the chest, near the belly, and behind the right leg. Damage there fills posture. Be close when posture breaks. The finisher is the light attack while he is down.
An early dive jumps and lands on you. It is unblockable. Step sideways. Do not trust the Saber's block for that one move. The flagpole reach is about three times a sword. He swings three times and steps in with each swing. Those swings are parryable.
The Rapier's parry is the stronger named parry if you are confident. The Saber still parries and can block other hits. The shoulder arms fire three pistol shots with even gaps. Sidestep each. Your own Pistol is for his weak points, not for a duel of magazines.
After his health drops he enters a second stage, changes shape, uses more plague-marked attacks, and summons soldiers. In that stage the arm grows, he drops the sword, and he fights with the enlarged arm while still using the flagpole.
Shooting the enlarged arm fills posture. The Musket can do it from further out. The Pistol can do it if you are already in the room. Burning him with Fire Transmutation is highly effective. He is the boss that names that element.
Refill Nephtoglobin on the weak points between casts. An empty purple bar wastes the advice. Bank Catalysts at the last lantern before you pull him. Dying drops the unspent pile, including anything you hoped to carry out of Revival.
Read the pole before you commit. Two different swings start with the flagpole raised behind his head and a short pause. One of them is three advancing steps. The other is two strikes and a stop. Both are parryable. Mixing up the count is how a third swing clips you after you thought the string had ended.
The dive can open the fight. He jumps and drives the pole into the ground. It is unblockable, so dodge to either side rather than raising the Saber. The three pistol shots from the shoulder arms are evenly spaced. Sidestep each one. They are not a cue to empty your own sidearm.
He can tear a corpse out of his body and throw it. Shoot the corpse or step sideways. In the second stage the enlarged arm comes overhead and sweeps sideways, and that sweep is unblockable. He also calls soldiers: some fire muskets on a cadence like the shoulder pistols, and some run in with swords. Cut the runners down before you tunnel on the banner.
Orange points on the chest, near the belly, and behind the right leg are what fill posture. The finisher is the light attack once he is down, so be close when the bar breaks. Shooting the enlarged arm in stage two is another way to fill that bar. Burning him is the use for a left-hand fire power, if that power is the one you were given.
| Move | Answer |
|---|---|
| Dive | Unblockable opening. Dodge to either side. |
| Flagpole, three steps | Parry the swings, or dodge back out of the pole. |
| Flagpole, two strikes | Also parryable. Do not expect a third hit. |
| Shoulder pistols | Three spaced shots. Sidestep each. |
| Corpse throw | Shoot the corpse, or step sideways. |
| Enlarged arm sweep | Stage two. Unblockable. |
| Raised soldiers | Musket fire plus swords that rush you. |
Chapter 7, Witch Hunt. He duels you in the village and drops 15000 Catalysts.
High Justiciar Aurelius, Last of the Faithful, is the Chapter 7 fight titled Witch Hunt. He is in the Village, toward the lighthouse.
He drops 15000 Catalysts, higher than Lothaire's 10000 and lower than the Sphinx's 20000. The fight is not optional. Chapter 7 is a gate, not a contract you can decline.
Stage one keeps a human stature and a single sword. It is a duel. His attacks are fast, with little or no wind-up, and they keep coming. Late reactions are the tax.
Because stage one is one sword at human size, the Saber's block and parry match the shape of the fight better than a long gun. The Rapier's stronger parry is the aggressive version of the same duel, if you accept that it cannot block properly.
Little wind-up means you parry on the hand, not on a long tell. If you are early, the Saber can still soak a hit and refund health on the riposte. The Musket's long single-target role has almost no runway in a lighthouse village duel. If you fire, do it as a punctuation, then return to the blade.
The Pistol can puncture a moment between swings. Scarce ammo means one shot, not a magazine. Posture still matters. Break it and take the light-attack finisher up close. A duel is already close. Do not back out so far that the finisher whiffs.
Phase two starts after enough damage. He uses an item and the free hand grows into a monstrous shape. He becomes faster, and the sword strings speed up with him. Fire stays Lothaire's element. Aurelius has none.
Perfectionism, the full-health Amber, is awkward in a fast duel that chips you. A heal on execution is kinder if you can force the posture break. Reach level 5 and socket at a lantern before the chapter if you want that Amber at all. The 15000 are not in your purse until he dies.
Unspent Catalysts still drop if he kills you. Spend on the way in. The Sphinx is the other fight if you are routing by chapter number. Chapter 4 is earlier than Witch Hunt. Aurelius is the later duel.
He has two phases. Phase one is swordsmanship, with a pistol shot only now and then. He can be parried and blocked, and the window is the breath after a pattern ends. Ferrofluid Flasks are the heal you burn when the parries keep missing.
Phase two begins once he is hurt enough. He uses an item, the free hand becomes a monstrous shape, and both his movement and his sword grow faster. The overall plan stays parry, block, and punish, with less room for a late call.
A dash slash is one cut that closes distance. A parry stops the damage. The phase-two version is the same cut thrown faster. A thrust is a long leap. Dodging straight back still loses, because he covers that ground. Step to the side.
His pistol shot can be blocked or parried. The claw string pretends to be two hits and is three, and after it he can mix a slash, a flurry, or a lunge. The monster leap is a jump into a drop, and it is unblockable. If you keep fleeing, he keeps choosing that leap. Punish the landing, then go back to the sword pattern.
| Move | Answer |
|---|---|
| Dash slash | One gap-closer. Parry it. Faster in phase two. |
| Thrust | Long leap. Dodge sideways, not backward. |
| Pistol shot | Block or parry. It is rare in phase one. |
| Claw string | Three hits, not two, then a mixup. |
| Monster leap | Unblockable drop. He repeats it if you run. |
Chapter 4, after the Salt Mines cart. Two stages, and a 20000 Catalyst drop.
Sphinx, Devourer of the Unworthy, is the Chapter 4 boss. You reach the fight after a cart through the Salt Mines, and the arena is the Caverns. The route is cart, mines, then the cavern fight.
It drops 20000 Catalysts, the largest of the three. The body is four-legged, with a golden headpiece, claws, a tail, and a pounce that closes the gap in one motion.
It has two stages. The second is enraged and the movement turns erratic. The fight is not optional. Plan to kill it to leave Chapter 4.
The pounce is the tell that deletes a Musket plan. You may get one long shot. After that you are in claw range. Sidestep the landing. A block on the Saber can blunt a late call, but the refund still wants a melee hit, and a pounce's recovery is when you take it.
The Rapier belongs in that recovery if you want weak spots and you can parry the next swipe. It will not block the pounce properly. Claws and the tail are the horizontal threats once it is down. The tail is the punish for standing behind it without looking.
The Pistol is the short gun for a spot you can see between swipes. Do not reload through the erratic second stage. Stage two's erratic movement means earlier dodge timings go stale. Relearn the pounce rather than assuming the first stage's rhythm.
Posture and the finisher still pay. Be close when the meter breaks. Backing off to reload the Musket is how you miss the light attack. Nephtoglobin comes back from spots and sword hits. Use a Transmutation in the recovery after a pounce, not while the body is in the air.
No fire weakness is attached to the Sphinx. Keep the Fire Transmutation advice on Lothaire. Perfectionism is hard to hold through a pounce that exists to touch you. Prefer it only if you are consistently clean on the sidestep.
A heal on execution matches a posture plan. Socket it at a lantern from level 5 before you ride the cart. Spend Catalysts before the ride. Dying in the cavern drops the unspent ones, and the 20000 are not yours until the second stage ends.
Bring a pistol plus a melee weapon. A blunderbuss is a heavy opening shot, and the pistol is better after that because it holds more rounds while the beast dashes and chains hits. Fire when it hesitates before a string, then stop shooting and parry.
The common pressure is a three-part combo with more than one variant. The plain variant is three slashes. Others begin with a scratch and then a drop or a leap. Parry the string. The body is open to melee right after the third hit, and those parries also build posture for a break.
Phase two starts the first time you put it down. Strings get faster, and the ranged moves gain stronger versions. A stalking slash in that phase steps forward on every cut. The tail strike also arrives in phase two and is fast enough to surprise you on the transition.
Leaps are a straight lunge or a high arc. The arc throws sand that costs endurance and does not cost health. Some leaps cannot be blocked. A breath attack stays short. An energy beam from the headpiece can only be dodged. Three purple pillars fly in phase one. Phase two sends nine, in three directions, so you look for a gap instead of rolling through the middle.
An energy ball hangs and then bursts along the ground. Jump it. Phase two uses three balls. That burst is timed with the three-part combo, which means the jump and the parry have to happen together. Other ranged shots are the ones a simple dodge still beats.
| Move | Answer |
|---|---|
| Three-part combo | Parry, then melee in the opening after the third hit. |
| Stalking slash | Phase two. Each slash is a step inward. |
| Arc leap | Sand costs endurance, not health. Some leaps are unblockable. |
| Tail | Phase two. Fast. Do not stand behind it blind. |
| Energy beam | Dodge only. It comes off the headpiece. |
| Pillars | Three in phase one, nine in phase two. Find the gap. |
| Energy ball | Jump the ground burst. Three balls in phase two. |
Lothaire, Aurelius, and the Sphinx can be read one at a time or all three together. Each name opens that fight. Catalyst drops are 10000, 15000, and 20000.
Lothaire is on the Battlefield and in the Valley of Ashes. Aurelius is in the Village. The Sphinx is in the Caverns, after the Salt Mines cart in Chapter 4. None of the three fights is optional. Do not look for a skip.
Compare reach before you compare theatrics. Lothaire shoots and swings a pole. Aurelius duels with one sword at human size in stage one. The Sphinx pounces. Your melee choices with names are the Saber, which blocks, and the Rapier, which does not block properly and breaks weak spots faster.
Your guns are the long Musket and the short Pistol. Scarce ammunition means the gun is a punctuation, especially on a boss that closes distance. Rest at a lantern before any of them. Unspent Catalysts drop if you die on the walk or in the arena.
Spend only Catalysts you have already banked at a lantern. The boss drop is not in your purse until the kill. Level 5 is still the first Amber slot even if a boss pays five figures. You cannot socket Perfectionism early just because the number is large.
Perfectionism wants full health. A heal on execution wants the posture break. Both Ambers help on every one of these fights. Transmutations spend Nephtoglobin. Fire Transmutation is highly effective on Lothaire. Aurelius and the Sphinx do not share that element.
Posture and the light-attack finisher are the shared kill condition. New Game Plus later in 2026 raises enemy pressure and keeps your loot. These three fights are the first-run move lists, not a second-loop kit.
Lothaire, Aurelius, and the Sphinx are the three fights with published move lists. Read Lothaire if you are still near the grave. Read Aurelius if the chapter counter says Witch Hunt. Read the Sphinx if you have taken the Salt Mines cart.
Lothaire is the banner fight. He is on the Battlefield during Revival and Regroup, then in the Valley of Ashes. He uses a flagpole, pistol-arms, a dive, and later an enlarged arm plus summoned soldiers. He drops 10000 Catalysts, and the fight is required.
Aurelius is the Chapter 7 duel titled Witch Hunt, in the village toward the lighthouse. Phase one is a human-sized swordsman with almost no wind-up and an occasional pistol shot. Phase two grows the free hand. He drops 15000 Catalysts, and the fight is required.
The Sphinx is the Chapter 4 fight on the quest Dark Descent. You arrive by cart through the Salt Mines, and the fight is in the Caverns. It pounces, then works with claws and a tail. Phase two is the enraged one, with a longer ranged kit. It drops 20000 Catalysts, the largest of the three.
Read the fight before you carry a plan across them. The fire advice is for Lothaire only. A village duel and a cavern pounce do not share his pole or his shoulder guns.